No edit summary |
m (Reverted edits by Dino-pluffet (talk) to last version by 1e27) |
||
| (38 intermediate revisions by 19 users not shown) | |||
| Line 3: | Line 3: | ||
{{Protection}} |
{{Protection}} |
||
{{For|a similar [[Builder Base Troops|Builder Base Troop]]|Sneaky Archer}} |
{{For|a similar [[Builder Base Troops|Builder Base Troop]]|Sneaky Archer}} |
||
| + | |||
| − | {{Clr}} |
||
[[File:Archer info.png|250px|center|link=]] |
[[File:Archer info.png|250px|center|link=]] |
||
| + | {{SuperTroopLink|Super Archer}} |
||
<center>'''''"These sharpshooters like to keep their distance on the battlefield and in life. Nothing makes them happier than single-mindedly taking down their target."'''''</center> |
<center>'''''"These sharpshooters like to keep their distance on the battlefield and in life. Nothing makes them happier than single-mindedly taking down their target."'''''</center> |
||
| − | |||
---- |
---- |
||
{| style="text-align:center; margin:auto; width: 650px;" |
{| style="text-align:center; margin:auto; width: 650px;" |
||
|- |
|- |
||
| − | |[[File:Archer1.png|link=]] |
+ | | [[File:Archer1.png|link=]] |
| − | |[[File:Archer3.png|link=]] |
+ | | [[File:Archer3.png|link=]] |
| − | |[[File:Archer5.png|link=]] |
+ | | [[File:Archer5.png|link=]] |
| − | |[[File:Archer6.png|link=]] |
+ | | [[File:Archer6.png|link=]] |
| − | |[[File:Archer7.png|link=]] |
+ | | [[File:Archer7.png|link=]] |
| − | |[[File:Archer8.png|link=]] |
+ | | [[File:Archer8.png|link=]] |
| + | | [[File:Archer9.png|47px|link=]] |
||
|- |
|- |
||
| style="width: 10%;" | '''Level 1 & 2''' |
| style="width: 10%;" | '''Level 1 & 2''' |
||
| Line 24: | Line 25: | ||
| style="width: 10%;" | '''Level 7''' |
| style="width: 10%;" | '''Level 7''' |
||
| style="width: 10%;" | '''Level 8''' |
| style="width: 10%;" | '''Level 8''' |
||
| + | | style="width: 10%;" | '''Level 9''' |
||
|} |
|} |
||
---- |
---- |
||
*'''Summary''' |
*'''Summary''' |
||
| − | **The Archer is a single target ranged troop unlocked in [[Barracks]] |
+ | **The Archer is a single target ranged troop unlocked with a level 2 [[Barracks]]. She is the first ranged troop unlocked in the [[Barracks]], and the second overall [[Army|troop]] unlocked in the game. |
| − | **The Archer is a female warrior with sharp eyes. She wears a short, light green dress, a hooded cape, a leather belt, and an attached small pouch. She has a quiver slung on her back, a gold |
+ | **The Archer is a female warrior with sharp eyes. She wears a short, light green dress, a hooded cape, a leather belt, and an attached small pouch. She has a quiver slung on her back, a gold short bow in her left hand, and a golden band on each of her upper arms. |
| − | **She is the first ranged troop unlocked in the [[Barracks]], and the second overall [[Army|troop]] unlocked in the game. |
||
**{{PreferredTarget|None}} |
**{{PreferredTarget|None}} |
||
---- |
---- |
||
*'''Offensive Strategy''' |
*'''Offensive Strategy''' |
||
| − | **Archers are very weak when under fire but have a long |
+ | **Archers are very weak when under fire but have a long-range and can attack over [[Walls]]. Their low health makes them vulnerable to nearly all [[Defensive Buildings|defenses]], but [[Mortar]]s, [[Wizard Tower]]s, and even [[Bomb]]s are especially dangerous as they deal splash damage, which can take out groups of Archers quickly. This hindrance can be alleviated by placing them in several small groups so that one or a few hits does not kill all of your Archers. |
**Archers work well when deployed in large numbers. However, it's a good idea to spread them out so that a [[Mortar]] or [[Wizard Tower]] cannot kill them with a single shot. This strategy is called an Archer Rush. |
**Archers work well when deployed in large numbers. However, it's a good idea to spread them out so that a [[Mortar]] or [[Wizard Tower]] cannot kill them with a single shot. This strategy is called an Archer Rush. |
||
| − | **Due to |
+ | **Due to Archer's low health, some people find it useful to use [[Barbarian]]s or [[Giant]]s as a distracting unit or "meat shield" in order to draw fire away from them. |
| − | **Even at higher levels, using solely Archers and [[Barbarian]]s |
+ | **Even at higher levels, using solely Archers and [[Barbarian]]s have a chance (albeit small) of getting 2 stars (50% damage and destroyed [[Town Hall]]). Rarely does this combination wipe a base entirely. This is one of the main reasons why an army combination of Barbarians and Archers is almost always used for farming rather than trophy pushing or war. |
**Archers can be destroyed in a single shot by a [[Mortar]] of the same level. Consequently, at [[Town Hall|Town Hall 9]] and above (with a level 7 [[Mortar]]), even maximum-level Archers can be killed instantly by [[Mortar]] fire. |
**Archers can be destroyed in a single shot by a [[Mortar]] of the same level. Consequently, at [[Town Hall|Town Hall 9]] and above (with a level 7 [[Mortar]]), even maximum-level Archers can be killed instantly by [[Mortar]] fire. |
||
**The [[Mortar|Mortar's]] blind spot is smaller than the Archer's range, so they aren't safe from any tower except [[Air Defense]]s. |
**The [[Mortar|Mortar's]] blind spot is smaller than the Archer's range, so they aren't safe from any tower except [[Air Defense]]s. |
||
| − | **Another strategy is to try out dead spots. Deploy one Archer for each building and see if you get hit by any defenses. With this tactic you will be able to destroy a lot of buildings and get a lot of loot without much loss. Additionally, you can go for the 50% damage and get one star by taking risks and destroying a few more buildings. |
+ | **Another strategy is to try out dead spots. Deploy one Archer for each building and see if you get hit by any defenses. With this tactic, you will be able to destroy a lot of buildings and get a lot of loot without much loss. Additionally, you can go for the 50% damage and get one star by taking risks and destroying a few more buildings. |
**They are good to take out lone buildings, like [[Builder's Hut]]s placed far away to prevent full destruction. |
**They are good to take out lone buildings, like [[Builder's Hut]]s placed far away to prevent full destruction. |
||
**Putting a handful of Archers on one defensive building where only that building can attack the group is usually successful, but should only be done depending on the level of both your Archers and the defending building. |
**Putting a handful of Archers on one defensive building where only that building can attack the group is usually successful, but should only be done depending on the level of both your Archers and the defending building. |
||
| − | **When the [[Archer Queen]] uses her Royal Cloak ability, she summons up to |
+ | **When the [[Archer Queen]] uses her Royal Cloak ability, she summons up to sixteen Archers equal to the level of Archers you have researched in the [[Laboratory]]. |
**Archers are expendable and have a very low cost, so you can deploy a few archers around an enemy base to set off some suspicious traps like [[Giant Bomb]]s so you can deploy other [[Army|troops]] safely. |
**Archers are expendable and have a very low cost, so you can deploy a few archers around an enemy base to set off some suspicious traps like [[Giant Bomb]]s so you can deploy other [[Army|troops]] safely. |
||
| − | **Archers are excellent at luring and killing [[Clan Castle]] troops, due to their ability to target dangerous troops at range. Spreading them out in a circle when killing the Clan Castle troops will |
+ | **Archers are excellent at luring and killing [[Clan Castle]] troops, due to their ability to target dangerous troops at the range. Spreading them out in a circle when killing the Clan Castle troops will minimize effects from splash-damaging troops like [[Wizard]]s or [[Dragon]]s. |
| + | ---- |
||
*'''Defensive Strategy''' |
*'''Defensive Strategy''' |
||
| − | **She is an excellent [[Army|troop]] to have in the [[Clan Castle]] because she can target both [[:Category:Air Troops|Air]] and [[:Category:Ground Troops|Ground Units]]. Like all low health [[Army|troops]] she is vulnerable to [[Lightning Spell]]s and [[Poison Spell]]s; if your enemy successfully lures them out of your [[Clan Castle]], he/she can wipe out all of your Archers with a single [[Lightning Spell]] or [[Poison Spell]]. You can make it more difficult to lure them out by locating your [[Clan Castle]] deep in the interior of your base. |
+ | **She is an excellent [[Army|troop]] to have in the [[Clan Castle]] because she can target both [[:Category:Air Troops|Air]] and [[:Category:Ground Troops|Ground Units]]. Like all low health [[Army|troops]], she is vulnerable to [[Lightning Spell]]s and [[Poison Spell]]s; if your enemy successfully lures them out of your [[Clan Castle]], he/she can wipe out all of your Archers with a single [[Lightning Spell]] or [[Poison Spell]]. You can make it more difficult to lure them out by locating your [[Clan Castle]] deep in the interior of your base. |
**If she is behind a [[Walls|Wall]] when enemy melee [[Army|Troops]] ''without a favorite target'' notice her, those [[Army|troops]] will start attacking the [[Walls|Wall]] in order to reach her. Unfortunately, she will often forget to stay behind the wall and begin attacking the [[Army|Troops]] in open space. |
**If she is behind a [[Walls|Wall]] when enemy melee [[Army|Troops]] ''without a favorite target'' notice her, those [[Army|troops]] will start attacking the [[Walls|Wall]] in order to reach her. Unfortunately, she will often forget to stay behind the wall and begin attacking the [[Army|Troops]] in open space. |
||
| + | **Archers are One-Shotted and Two-Shotted by most [[Defensive Buildings|defenses]]. Since most tanks are Melee, try to separate them by any means to start destroying them |
||
| + | **Archers are also used to defeat corner [[Builder's Hut|huts]] and pick off small buildings. Have no corner huts and also protect all trash buildings with defenses to make them a waste of housing space. |
||
---- |
---- |
||
*'''Upgrade Differences''' |
*'''Upgrade Differences''' |
||
| − | **The Archer undergoes significant visual changes at levels 3, 5 and |
+ | **The Archer undergoes significant visual changes at levels 3, 5, 6, 7, 8, and 9. |
| − | ***Initially, the Archer is a young woman, with pink hair, green |
+ | ***Initially, the Archer is a young woman, with pink hair, green-colored clothing, including a belt. She also has a bow with arrows stored on her back. |
***At level 3, the Archer’s hair turns purple and has a quiver full of flaming arrows. |
***At level 3, the Archer’s hair turns purple and has a quiver full of flaming arrows. |
||
***At level 5, the Archer’s hair turns back to pink, but she now wears her hood up. She has a quiver full of lightning arrows. |
***At level 5, the Archer’s hair turns back to pink, but she now wears her hood up. She has a quiver full of lightning arrows. |
||
***At level 6, the Archer's hair switches back to a slightly darker shade of purple that grows slightly longer. She gains a tiara and the arrows have purple fletchings. Her cape also turns from green to black. |
***At level 6, the Archer's hair switches back to a slightly darker shade of purple that grows slightly longer. She gains a tiara and the arrows have purple fletchings. Her cape also turns from green to black. |
||
***At level 7, the Archer gains a small black crystal, similar to that of level eight walls on her tiara, which she wears untucked. Her cape becomes lined with a gold fabric and her quiver receives gold trim. Her arrows flame up whenever they are shot. |
***At level 7, the Archer gains a small black crystal, similar to that of level eight walls on her tiara, which she wears untucked. Her cape becomes lined with a gold fabric and her quiver receives gold trim. Her arrows flame up whenever they are shot. |
||
| + | ***At level 8, the Archer’s hair turns back to its original pink color and her tiara’s crystal turns purple, similar to that of a level 7 wall. Her tiara now has a “V” shaped crest for the crystal. |
||
| + | ***At level 9, the Archer's tiara now has a "^" Shaped crest and the crystal is now larger and ice blue. |
||
---- |
---- |
||
*'''Trivia''' |
*'''Trivia''' |
||
| − | **It's unknown why the Archer has a small pouch on her belt, though it's most likely there to store supplies such as |
+ | **It's unknown why the Archer has a small pouch on her belt, though it's most likely there to store supplies such as bowstrings and water. |
**Archers are generally recognized as the most popularly requested [[Army|troops]] for the [[Clan Castle]]. |
**Archers are generally recognized as the most popularly requested [[Army|troops]] for the [[Clan Castle]]. |
||
**When you tap on the [[Army Camp]], all the archers stationed there pump their fists in the air three times. |
**When you tap on the [[Army Camp]], all the archers stationed there pump their fists in the air three times. |
||
| − | **{{MaximumTroopCount}} |
+ | **{{MaximumTroopCount}} You can also summon 18 additional Archers with a maximum-level [[Archer Queen]]. |
**Since the July 1, 2015 Update, the arrow speed of the Archers and the [[Archer Tower]]s has been increased. |
**Since the July 1, 2015 Update, the arrow speed of the Archers and the [[Archer Tower]]s has been increased. |
||
**She is the only ranged low health unit, although the [[Minion]] can be used in a similar role. |
**She is the only ranged low health unit, although the [[Minion]] can be used in a similar role. |
||
**Unlocking the Archer in the [[Barracks]] earns you the first level of the [[Achievements|Release the Beasts]] achievement. |
**Unlocking the Archer in the [[Barracks]] earns you the first level of the [[Achievements|Release the Beasts]] achievement. |
||
**She is one of 6 female [[Army|Troops]], which includes the [[Archer Queen]]. |
**She is one of 6 female [[Army|Troops]], which includes the [[Archer Queen]]. |
||
| − | **Archers are among the only four [[Army|troops]] in the Home Village that actually lived in history. All the other [[Army|troops]] (except [[Barbarian]]s, [[Miner]]s, and maybe [[Balloon]]s) are based |
+ | **Archers are among the only four [[Army|troops]] in the Home Village that actually lived in history. All the other [[Army|troops]] (except [[Barbarian]]s, [[Miner]]s, and maybe [[Balloon]]s and [[P.E.K.K.A]]) are based on a mythological human/creature. [[P.E.K.K.A]] may not be based on a mythological human/creature and may be based of off a knight or samurai. |
**As of the October 2016 Update, the training time of Archers for a single Barracks has been reduced from 25 seconds to 24 seconds. |
**As of the October 2016 Update, the training time of Archers for a single Barracks has been reduced from 25 seconds to 24 seconds. |
||
**On 17 March 2013 there was a Clash-Off competition involving Archers and [[Valkyrie]]s: |
**On 17 March 2013 there was a Clash-Off competition involving Archers and [[Valkyrie]]s: |
||
| Line 73: | Line 79: | ||
<center> |
<center> |
||
| − | |||
<div style="margin-top: 10px; margin-bottom:10px; border:0px ridge Green; padding: 10px; font-size: 100%; -moz-border-radius: 15px; border-radius:15px; -webkit-border-radius:15px; border-color: silver; color:black; background-color: gainsboro;"> |
<div style="margin-top: 10px; margin-bottom:10px; border:0px ridge Green; padding: 10px; font-size: 100%; -moz-border-radius: 15px; border-radius:15px; -webkit-border-radius:15px; border-color: silver; color:black; background-color: gainsboro;"> |
||
| + | {{Modifiers|type=TroopHV}} |
||
| − | {| border="0" cellpadding="1" cellspacing="1 |
+ | {| class="wikitable" border="0" cellpadding="1" cellspacing="1" style="text-align: center; width: 100%;" |
| − | ! data-type="preferred target" | Preferred Target {{Res|RES=Target}} |
||
| − | ! |
+ | ! Preferred Target {{Res|RES=Target}} |
| ⚫ | |||
| − | ! |
+ | ! {{H|Army Camp|Housing Space}} {{Res|RES=Housing}} |
| − | ! data-type="movement speed" | [[Troop Movement Speed|Movement Speed]] {{Res|RES=Speed}} |
||
| − | ! |
+ | ! [[Troop Movement Speed|Movement Speed]] {{Res|RES=Speed}} |
| + | ! Attack Speed {{Res|RES=Attack Speed}} |
||
| − | ! data-type="barracks level" | [[Barracks]] Level Required {{Res|RES=Barracks}} |
||
| − | ! |
+ | ! [[Barracks]] Level Required {{Res|RES=Barracks}} |
| + | ! Range {{Res|RES=Range}} |
||
|- |
|- |
||
| − | |None |
+ | | None |
| − | |Ranged (Ground& |
+ | | Ranged (Ground & Air) |
| − | |1 |
+ | | 1 |
| + | | class="ModifierStat Speed" | 24 |
||
| − | |24 |
||
| + | | class="AttackSpeed" | 1s |
||
| − | |1s |
||
| − | |2 |
+ | | 2 |
| − | |3.5 tiles |
+ | | 3.5 tiles |
|} |
|} |
||
| − | {| class="wikitable |
+ | {| class="wikitable" border="0" cellpadding="1" cellspacing="1" style="text-align: center; width: 650px;" |
| − | ! colspan=" |
+ | ! colspan="4" style="text-align: center; width: 650px" |<big>'''Training Time of Archers'''</big> |
|- |
|- |
||
| − | ! |
+ | ! 1 [[Barracks]] |
| + | ! 2 [[Barracks]] |
||
| − | !Training Time |
||
| + | ! 3 [[Barracks]] |
||
| + | ! 4 [[Barracks]] |
||
|- |
|- |
||
| + | | class="GoldPass 1B" | 24s |
||
| ⚫ | |||
| + | | class="GoldPass 2B" | 12s |
||
| − | |24 seconds |
||
| + | | class="GoldPass 3B" | 8s |
||
| + | | class="GoldPass 4B" | 6s |
||
| ⚫ | |||
| ⚫ | |||
| ⚫ | |||
| ⚫ | |||
| + | ! Damage per Attack<br />{{Res|RES=Damage}} |
||
| ⚫ | |||
| ⚫ | |||
| ⚫ | |||
| ⚫ | |||
| ⚫ | |||
|- |
|- |
||
| − | | |
+ | | 1 |
| + | | class="ModifierStat DPS" | 7 |
||
| − | |12 seconds |
||
| + | | class="ModifierStat DPH" | 7 |
||
| + | | class="ModifierStat HP" | 20 |
||
| + | | class="GoldPass tCost" | 50 |
||
| ⚫ | |||
| ⚫ | |||
| + | | N/A |
||
|- |
|- |
||
| − | | |
+ | | 2 |
| + | | class="ModifierStat DPS" | 9 |
||
| − | |8 seconds |
||
| + | | class="ModifierStat DPH" | 9 |
||
| + | | class="ModifierStat HP" | 23 |
||
| + | | class="GoldPass tCost" | 80 |
||
| + | | class="GoldPass rCost" | 50,000 |
||
| + | | class="GoldPass rTime" | 12h |
||
| ⚫ | |||
|- |
|- |
||
| − | | |
+ | | 3 |
| + | | class="ModifierStat DPS" | 12 |
||
| − | |6 seconds |
||
| + | | class="ModifierStat DPH" | 12 |
||
| ⚫ | |||
| + | | class="ModifierStat HP" | 28 |
||
| − | |||
| + | | class="GoldPass tCost" | 120 |
||
| ⚫ | |||
| + | | class="GoldPass rCost" | 250,000 |
||
| ⚫ | |||
| + | | class="GoldPass rTime" | 1d |
||
| ⚫ | |||
| ⚫ | |||
| ⚫ | |||
| ⚫ | |||
| ⚫ | |||
| ⚫ | |||
| ⚫ | |||
| ⚫ | |||
|- |
|- |
||
| − | | |
+ | | 4 |
| + | | class="ModifierStat DPS" | 16 |
||
| − | |7 |
||
| + | | class="ModifierStat DPH" | 16 |
||
| − | |7 |
||
| + | | class="ModifierStat HP" | 33 |
||
| − | |20 |
||
| + | | class="GoldPass tCost" | 200 |
||
| − | |50 |
||
| + | | class="GoldPass rCost" | 750,000 |
||
| ⚫ | |||
| + | | class="GoldPass rTime" | 2d |
||
| ⚫ | |||
| − | | |
+ | | 5 |
|- |
|- |
||
| − | | |
+ | | 5 |
| + | | class="ModifierStat DPS" | 20 |
||
| − | |9 |
||
| + | | class="ModifierStat DPH" | 20 |
||
| − | |9 |
||
| + | | class="ModifierStat HP" | 40 |
||
| − | |23 |
||
| + | | class="GoldPass tCost" | 300 |
||
| − | |80 |
||
| + | | class="GoldPass rCost" | 1,500,000 |
||
| − | |50,000 |
||
| + | | class="GoldPass rTime" | 3d |
||
| − | |1 |
||
| − | | |
+ | | 6 |
|- |
|- |
||
| − | | |
+ | | 6 |
| + | | class="ModifierStat DPS" | 22 |
||
| − | |12 |
||
| + | | class="ModifierStat DPH" | 22 |
||
| − | |12 |
||
| + | | class="ModifierStat HP" | 44 |
||
| − | |28 |
||
| + | | class="GoldPass tCost" | 400 |
||
| − | |120 |
||
| − | |250,000 |
+ | | class="GoldPass rCost" | 3,250,000 |
| + | | class="GoldPass rTime" | 4d |
||
| ⚫ | |||
| − | | |
+ | | 7 |
|- |
|- |
||
| − | | |
+ | | 7 |
| + | | class="ModifierStat DPS" | 25 |
||
| − | |16 |
||
| + | | class="ModifierStat DPH" | 25 |
||
| − | |16 |
||
| + | | class="ModifierStat HP" | 48 |
||
| − | |33 |
||
| + | | class="GoldPass tCost" | 500 |
||
| − | |200 |
||
| + | | class="GoldPass rCost" | 5,000,000 |
||
| − | |750,000 |
||
| + | | class="GoldPass rTime" | 5d |
||
| − | |5 |
||
| − | | |
+ | | 8 |
|- |
|- |
||
| − | | |
+ | | 8 |
| + | | class="ModifierStat DPS" | 28 |
||
| − | |20 |
||
| + | | class="ModifierStat DPH" | 28 |
||
| − | |20 |
||
| + | | class="ModifierStat HP" | 52 |
||
| − | |40 |
||
| + | | class="GoldPass tCost" | 600 |
||
| − | |300 |
||
| + | | class="GoldPass rCost" | 8,000,000 |
||
| − | |2,250,000 |
||
| + | | class="GoldPass rTime" | 8d |
||
| − | |6 |
||
| − | | |
+ | | 9 |
|- |
|- |
||
| − | | |
+ | | 9 |
| + | | class="ModifierStat DPS" | 31 |
||
| − | |22 |
||
| + | | class="ModifierStat DPH" | 31 |
||
| − | |22 |
||
| + | | class="ModifierStat HP" | 56 |
||
| − | |44 |
||
| + | | class="GoldPass tCost" | 700 |
||
| − | |400 |
||
| + | | class="GoldPass rCost" | 11,500,000 |
||
| − | |6,000,000 |
||
| + | | class="GoldPass rTime" | 12d |
||
| − | |7 |
||
| − | | |
+ | | 10 |
| − | |- |
||
| − | |7 |
||
| − | |25 |
||
| − | |25 |
||
| − | |48 |
||
| − | |500 |
||
| − | |7,500,000 |
||
| − | |8 |
||
| − | |9 days |
||
| − | |- |
||
| − | |8 |
||
| − | |28 |
||
| − | |28 |
||
| − | |52 |
||
| − | |600 |
||
| − | |9,000,000 |
||
| − | |9 |
||
| − | |10 days |
||
|} |
|} |
||
{{UCH}} |
{{UCH}} |
||
</div> |
</div> |
||
</center> |
</center> |
||
| − | |||
{{TroopsMenuHV}} |
{{TroopsMenuHV}} |
||
[[Category:Troops]] |
[[Category:Troops]] |
||
Revision as of 05:44, 17 September 2020

- For a similar Builder Base Troop, see Sneaky Archer.
| Level 1 & 2 | Level 3 & 4 | Level 5 | Level 6 | Level 7 | Level 8 | Level 9 |
- Summary
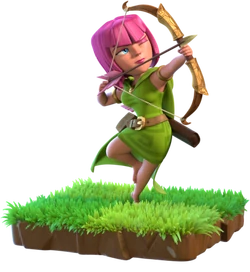
- The Archer is a single target ranged troop unlocked with a level 2 Barracks. She is the first ranged troop unlocked in the Barracks, and the second overall troop unlocked in the game.
- The Archer is a female warrior with sharp eyes. She wears a short, light green dress, a hooded cape, a leather belt, and an attached small pouch. She has a quiver slung on her back, a gold short bow in her left hand, and a golden band on each of her upper arms.
- Archers have no preferred target when attacking; they will simply attack the closest building. However, if they become aware of enemy Clan Castle troops, Heroes, or Skeleton Trap skeletons (either by being attacked themselves or by being near another friendly troop under attack), and can fight back against them, they will leave their previously targeted building and instead engage the enemy troops. Once all of the nearby enemy troops are defeated, the Archers will proceed to attack the nearest structure.
- Offensive Strategy
- Archers are very weak when under fire but have a long-range and can attack over Walls. Their low health makes them vulnerable to nearly all defenses, but Mortars, Wizard Towers, and even Bombs are especially dangerous as they deal splash damage, which can take out groups of Archers quickly. This hindrance can be alleviated by placing them in several small groups so that one or a few hits does not kill all of your Archers.
- Archers work well when deployed in large numbers. However, it's a good idea to spread them out so that a Mortar or Wizard Tower cannot kill them with a single shot. This strategy is called an Archer Rush.
- Due to Archer's low health, some people find it useful to use Barbarians or Giants as a distracting unit or "meat shield" in order to draw fire away from them.
- Even at higher levels, using solely Archers and Barbarians have a chance (albeit small) of getting 2 stars (50% damage and destroyed Town Hall). Rarely does this combination wipe a base entirely. This is one of the main reasons why an army combination of Barbarians and Archers is almost always used for farming rather than trophy pushing or war.
- Archers can be destroyed in a single shot by a Mortar of the same level. Consequently, at Town Hall 9 and above (with a level 7 Mortar), even maximum-level Archers can be killed instantly by Mortar fire.
- The Mortar's blind spot is smaller than the Archer's range, so they aren't safe from any tower except Air Defenses.
- Another strategy is to try out dead spots. Deploy one Archer for each building and see if you get hit by any defenses. With this tactic, you will be able to destroy a lot of buildings and get a lot of loot without much loss. Additionally, you can go for the 50% damage and get one star by taking risks and destroying a few more buildings.
- They are good to take out lone buildings, like Builder's Huts placed far away to prevent full destruction.
- Putting a handful of Archers on one defensive building where only that building can attack the group is usually successful, but should only be done depending on the level of both your Archers and the defending building.
- When the Archer Queen uses her Royal Cloak ability, she summons up to sixteen Archers equal to the level of Archers you have researched in the Laboratory.
- Archers are expendable and have a very low cost, so you can deploy a few archers around an enemy base to set off some suspicious traps like Giant Bombs so you can deploy other troops safely.
- Archers are excellent at luring and killing Clan Castle troops, due to their ability to target dangerous troops at the range. Spreading them out in a circle when killing the Clan Castle troops will minimize effects from splash-damaging troops like Wizards or Dragons.
- Defensive Strategy
- She is an excellent troop to have in the Clan Castle because she can target both Air and Ground Units. Like all low health troops, she is vulnerable to Lightning Spells and Poison Spells; if your enemy successfully lures them out of your Clan Castle, he/she can wipe out all of your Archers with a single Lightning Spell or Poison Spell. You can make it more difficult to lure them out by locating your Clan Castle deep in the interior of your base.
- If she is behind a Wall when enemy melee Troops without a favorite target notice her, those troops will start attacking the Wall in order to reach her. Unfortunately, she will often forget to stay behind the wall and begin attacking the Troops in open space.
- Archers are One-Shotted and Two-Shotted by most defenses. Since most tanks are Melee, try to separate them by any means to start destroying them
- Archers are also used to defeat corner huts and pick off small buildings. Have no corner huts and also protect all trash buildings with defenses to make them a waste of housing space.
- Upgrade Differences
- The Archer undergoes significant visual changes at levels 3, 5, 6, 7, 8, and 9.
- Initially, the Archer is a young woman, with pink hair, green-colored clothing, including a belt. She also has a bow with arrows stored on her back.
- At level 3, the Archer’s hair turns purple and has a quiver full of flaming arrows.
- At level 5, the Archer’s hair turns back to pink, but she now wears her hood up. She has a quiver full of lightning arrows.
- At level 6, the Archer's hair switches back to a slightly darker shade of purple that grows slightly longer. She gains a tiara and the arrows have purple fletchings. Her cape also turns from green to black.
- At level 7, the Archer gains a small black crystal, similar to that of level eight walls on her tiara, which she wears untucked. Her cape becomes lined with a gold fabric and her quiver receives gold trim. Her arrows flame up whenever they are shot.
- At level 8, the Archer’s hair turns back to its original pink color and her tiara’s crystal turns purple, similar to that of a level 7 wall. Her tiara now has a “V” shaped crest for the crystal.
- At level 9, the Archer's tiara now has a "^" Shaped crest and the crystal is now larger and ice blue.
- The Archer undergoes significant visual changes at levels 3, 5, 6, 7, 8, and 9.
- Trivia
- It's unknown why the Archer has a small pouch on her belt, though it's most likely there to store supplies such as bowstrings and water.
- Archers are generally recognized as the most popularly requested troops for the Clan Castle.
- When you tap on the Army Camp, all the archers stationed there pump their fists in the air three times.
- You can have a maximum of 320 Archers at one time in a complete set of fully upgraded Army Camps. This number increases to 370 if you include the 50 that can fit into a fully upgraded Clan Castle. On the battlefield, you can clone an additional 168 Archers with four fully upgraded Clone Spells (three from the regular spell inventory and one from a level 10 or higher Clan Castle), and summon an additional 35 through an Archer Queen equipped with a maximum-level Archer Puppet, for a total of 573 Archers. You can also summon 18 additional Archers with a maximum-level Archer Queen.
- Since the July 1, 2015 Update, the arrow speed of the Archers and the Archer Towers has been increased.
- She is the only ranged low health unit, although the Minion can be used in a similar role.
- Unlocking the Archer in the Barracks earns you the first level of the Release the Beasts achievement.
- She is one of 6 female Troops, which includes the Archer Queen.
- Archers are among the only four troops in the Home Village that actually lived in history. All the other troops (except Barbarians, Miners, and maybe Balloons and P.E.K.K.A) are based on a mythological human/creature. P.E.K.K.A may not be based on a mythological human/creature and may be based of off a knight or samurai.
- As of the October 2016 Update, the training time of Archers for a single Barracks has been reduced from 25 seconds to 24 seconds.
- On 17 March 2013 there was a Clash-Off competition involving Archers and Valkyries:
Statistic Modifiers
Input values into these modifiers below to modify the statistics in the tables below accordingly
Gold Pass modifiers 
Rocket Balloon Spotlight modifiers
| ApplyReset |
| Preferred Target |
Attack Type |
Housing Space |
Movement Speed |
Attack Speed |
Barracks Level Required |
Range |
|---|---|---|---|---|---|---|
| None | Ranged (Ground & Air) | 1 | 24 | 1s | 2 | 3.5 tiles |
| Training Time of Archers | |||
|---|---|---|---|
| 1 Barracks | 2 Barracks | 3 Barracks | 4 Barracks |
| 24s | 12s | 8s | 6s |
| Level |
Damage per Second |
Damage per Attack |
Hitpoints |
Training Cost |
Research Cost |
Research Time |
Laboratory Level Required |
|---|---|---|---|---|---|---|---|
| 1 | 7 | 7 | 20 | 50 | N/A | N/A | N/A |
| 2 | 9 | 9 | 23 | 80 | 50,000 | 12h | 1 |
| 3 | 12 | 12 | 28 | 120 | 250,000 | 1d | 3 |
| 4 | 16 | 16 | 33 | 200 | 750,000 | 2d | 5 |
| 5 | 20 | 20 | 40 | 300 | 1,500,000 | 3d | 6 |
| 6 | 22 | 22 | 44 | 400 | 3,250,000 | 4d | 7 |
| 7 | 25 | 25 | 48 | 500 | 5,000,000 | 5d | 8 |
| 8 | 28 | 28 | 52 | 600 | 8,000,000 | 8d | 9 |
| 9 | 31 | 31 | 56 | 700 | 11,500,000 | 12d | 10 |
Template:UCH