No edit summary Tag: rte-source |
No edit summary Tag: Visual edit |
||
| (105 intermediate revisions by 33 users not shown) | |||
| Line 1: | Line 1: | ||
__NOTOC__ __NOEDITSECTION__ |
__NOTOC__ __NOEDITSECTION__ |
||
| + | |||
{{Protection}} |
{{Protection}} |
||
| + | [[File:Gem Mine10.png|center|link=]] |
||
| ⚫ | |||
| − | <span class="info-central-image">[[File:GemMine5.png|300x150px|center|link=]] </span> |
||
| − | |||
| ⚫ | |||
| ⚫ | |||
| − | </center> |
||
---- |
---- |
||
| + | <div class="flexbox-display bold-text"> |
||
| − | {| style="text-align:center; margin:auto; width: 650px;" |
||
| + | <div>[[File:Gem Mine Ruin.png|100px|link=]]<div>Ruin</div></div> |
||
| ⚫ | |||
| − | + | <div>[[File:Gem Mine1.png|100px|link=]]<div>Level 1</div></div> |
|
| − | + | <div>[[File:Gem Mine2.png|100px|link=]]<div>Level 2</div></div> |
|
| − | + | <div>[[File:Gem Mine3.png|100px|link=]]<div>Level 3</div></div> |
|
| − | + | <div>[[File:Gem Mine4.png|100px|link=]]<div>Level 4</div></div> |
|
| + | <div>[[File:Gem Mine5.png|100px|link=]]<div>Level 5</div></div> |
||
| ⚫ | |||
| + | <div>[[File:Gem Mine6.png|100px|link=]]<div>Level 6</div></div> |
||
| − | |'''Ruin''' |
||
| + | <div>[[File:Gem Mine7.png|100px|link=]]<div>Level 7</div></div> |
||
| − | |'''Level 1''' |
||
| + | <div>[[File:Gem Mine8.png|100px|link=]]<div>Level 8</div></div> |
||
| − | |'''Level 2''' |
||
| + | <div>[[File:Gem Mine9.png|100px|link=]]<div>Level 9</div></div> |
||
| − | |'''Level 3''' |
||
| + | <div>[[File:Gem Mine10.png|100px|link=]]<div>Level 10</div></div> |
||
| ⚫ | |||
| + | </div> |
||
| − | {| style="text-align:center; margin:auto; width:500px;" |
||
| ⚫ | |||
| − | |<span class="info-rollover-image">[[File:GemMine4.png|100px|link=]]</span> |
||
| − | |<span class="info-rollover-image">[[File:GemMine5.png|100px|link=]]</span> |
||
| − | |<span class="info-rollover-image">[[File:GemMine6.png|100px|link=]]</span> |
||
| ⚫ | |||
| − | |'''Level 4''' |
||
| − | |'''Level 5''' |
||
| − | |'''Level 6''' |
||
| ⚫ | |||
| − | ---- |
||
| ⚫ | |||
| ⚫ | |||
| ⚫ | |||
| − | ---- |
||
| ⚫ | |||
| − | **Gem Mines undergo a significant visual change at level 3. |
||
| ⚫ | |||
| ⚫ | |||
| ⚫ | |||
| ⚫ | |||
| ⚫ | |||
| ⚫ | |||
| − | ---- |
||
| ⚫ | |||
| ⚫ | |||
| ⚫ | |||
| − | **This building has low hitpoints. |
||
| − | ---- |
||
| ⚫ | |||
| − | **The Gem Mine is the only building that produces gems. |
||
| ⚫ | |||
| − | ---- |
||
| ⚫ | |||
| − | **The Gem Mine was added on 5/22/2017. |
||
| ⚫ | |||
| ⚫ | |||
| − | <div style="margin-top: 10px; margin-bottom:10px; border:0px ridge Green; padding: 10px; font-size: 100%; -moz-border-radius: 15px; border-radius:15px; -webkit-border-radius:15px; border-color: silver; color:black; background-color: gainsboro;"> |
||
| ⚫ | |||
| − | <center> |
||
| + | *When in disrepair, the Gem Mine is treated similarly to an [[Obstacles|obstacle]] (much like the ruined [[Clan Castle]]) and cannot be moved around; attacking troops will not be able to attack or destroy it (nor do they need to do so in order to achieve 100% destruction). Once rebuilt, it can be moved freely around. |
||
| ⚫ | |||
| + | **However, troops cannot be deployed on top of it. |
||
| ⚫ | |||
| + | *Like other resource-producing buildings in both villages, upgrading the Gem Mine will disable production for the duration of the upgrade. |
||
| + | *If you want to farm gems, this is the best way to do so(other then obstacles), but is you want to get higher builder base level, upgrade this building later as it just wastes builder elixir and has no direct improvement on your buillder base. |
||
| + | **Gem Farming is also paired good with the [[Clock Tower]], as it will not just make the builder work faster and get gems quicker, it will also make gem production faster. |
||
| + | **Unlike the Gem Mine, The Clock Tower is still good to upgrade even if you are pushing builder base, as you get free boosts that improve in time, which helps with troop research time and builder. |
||
| + | |||
| ⚫ | |||
| ⚫ | |||
| ⚫ | |||
| + | *This building has low hitpoints, so it is better to place it outside of the {{B|Walls}} or the base to not waste space in the base. |
||
| + | |||
| ⚫ | |||
| ⚫ | *In its initial ruined state, it appears as a derelict, overgrown cave with mushrooms and a tree. A Gem insignia on a wooden hexagon on the side of the rocks can be found on the Mine's side. There are large broken wooden supports with ropes covering the entrance and a broken box. There are also [[Gems]] scattered around the Mine. |
||
| ⚫ | |||
| ⚫ | |||
| ⚫ | |||
| ⚫ | |||
| ⚫ | |||
| + | **At level 6, the pulley system becomes bronze, with wood covering the roof and a bronze piece riveted down to protect the axle. The stray bits of Gem at the side is cleared up. |
||
| + | **At level 7, two bronze piece secures the axle on the ends to the roof instead of the middle, which suspends the pulley system higher. Ropes can be seen between the two pulleys, and the roof is made of stone. The Gem Mine receives a stone foundation. |
||
| + | **At level 8, the wooden supports at the corners are replaced with larger wooden beams. The beams are slanted, does not use bronze reinforcements at the base, and support a new pulley system consisting of one large pulley with its axle attached to much bigger bronze pieces bolted to the roof. |
||
| + | **At level 9, the bases of the supports at the corners have been replaced with iron bases. The reinforcing plates at the roof now covers the top of the vertical beam and holds the bigger horizontal ones. The axle is now iron and protrudes out, it is bolted by golden nuts at each end, the back bronze piece is riveted, the pulley is larger and replaced with an iron groove with gold wheels. |
||
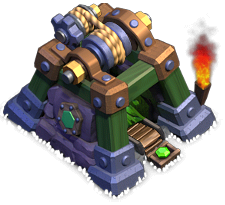
| + | **At level 10, the wooden beams are painted green. The pulley is thicker and is fully made of iron, another smaller pulley is added on the back, drove by a gear and pulling on a thicker rope. The Gem insignia's frame is now metal and the Gems in the mine now glow green. |
||
| + | |||
| + | ==Statistics== |
||
| + | <div class="stats-background"> |
||
| ⚫ | |||
|BH3=1 |
|BH3=1 |
||
| + | |UseStages=Yes |
||
}} |
}} |
||
{{BuildingSize|3x3}} |
{{BuildingSize|3x3}} |
||
| − | {| |
+ | {|class="wikitable" border="0" cellpadding="1" cellspacing="1" style="text-align: center; margin: 0px auto;" |
!Level<br />{{Res|RES=Level}} |
!Level<br />{{Res|RES=Level}} |
||
| ⚫ | |||
| ⚫ | |||
| + | !Production Time per Gem<br />{{Res|RES=Time}} |
||
| ⚫ | |||
| + | !Hitpoints<br />{{Res|RES=Hitpoint}} |
||
!Build Cost<br />{{Res|RES=ElixirB}} |
!Build Cost<br />{{Res|RES=ElixirB}} |
||
!Build Time<br />{{Res|RES=Time}} |
!Build Time<br />{{Res|RES=Time}} |
||
![[Experience]] Gained<br />{{Res|RES=XP}} |
![[Experience]] Gained<br />{{Res|RES=XP}} |
||
| ⚫ | |||
| ⚫ | |||
| ⚫ | |||
| − | !Time to Fill |
||
| ⚫ | |||
| ⚫ | |||
![[Builder Hall]] Level Required<br />{{Res|RES=Builder Hall}} |
![[Builder Hall]] Level Required<br />{{Res|RES=Builder Hall}} |
||
|- |
|- |
||
| + | |1||10||2.16 ||style="white-space:nowrap;"|11h 6m 40s||style="white-space:nowrap;"|4d 15h 6m 40s||300||class="GoldPass bCost"|120,000||class="GoldPass bTime" style="white-space:nowrap;"|1h||class="GoldPass EXP"|60||N/A||3 |
||
| ⚫ | |||
| − | |120,000 |
||
| − | |1 hr |
||
| − | |60 |
||
| − | |10 |
||
| − | |2.1 |
||
| − | |4d 18h 17m 9s |
||
| − | |N/A |
||
| − | |300 |
||
| ⚫ | |||
|- |
|- |
||
| + | |2||11||2.40||style="white-space:nowrap;"|10h||style="white-space:nowrap;"|4d 14h||350||class="GoldPass bCost"|180,000||class="GoldPass bTime" style="white-space:nowrap;"|2h||class="GoldPass EXP"|84||class="GoldPass catchUp" style="white-space:nowrap;"|18h||3 |
||
| ⚫ | |||
| − | |180,000 |
||
| − | |2 hr |
||
| − | |84 |
||
| − | |11 |
||
| − | |2.4 |
||
| − | |4d 14h |
||
| − | |14h |
||
| − | |345 |
||
| ⚫ | |||
|- |
|- |
||
| + | |3||12||2.64 ||style="white-space:nowrap;"|9h 5m 27s||style="white-space:nowrap;"|4d 13h 5m 27s||400||class="GoldPass bCost"|240,000||class="GoldPass bTime" style="white-space:nowrap;"|6h||class="GoldPass EXP"|146||class="GoldPass catchUp" style="white-space:nowrap;"|2d 12h||3 |
||
| ⚫ | |||
| − | |240,000 |
||
| − | |6 hr |
||
| − | |146 |
||
| − | |12 |
||
| − | |2.6 |
||
| − | |4d 14h 46m 9s |
||
| − | |3d |
||
| − | |397 |
||
| − | |4 |
||
|- |
|- |
||
| + | |4||13||2.88||style="white-space:nowrap;"|8h 20m||style="white-space:nowrap;"|4d 12h 20m||450||class="GoldPass bCost"|450,000||class="GoldPass bTime" style="white-space:nowrap;"|8h||class="GoldPass EXP"|169||class="GoldPass catchUp" style="white-space:nowrap;"|3d 16h||class="change-highlight"|4 |
||
| − | |4 |
||
| − | |450,000 |
||
| − | |8 hr |
||
| − | |169 |
||
| − | |13 |
||
| − | |2.8 |
||
| − | |4d 15h 25m 43s |
||
| − | |4d 8h |
||
| − | |457 |
||
| − | |4 |
||
|- |
|- |
||
| + | |5||14||3.12||style="white-space:nowrap;"|7h 41m 32s||style="white-space:nowrap;"|4d 11h 41m 32s||550||class="GoldPass bCost"|1,000,000||class="GoldPass bTime" style="white-space:nowrap;"|12h||class="GoldPass EXP"|207||class="GoldPass catchUp" style="white-space:nowrap;"|6d||5 |
||
| − | |5 |
||
| ⚫ | |||
| − | |1,000,000 |
||
| + | |6||15||3.36||style="white-space:nowrap;"|7h 8m 34s||style="white-space:nowrap;"|4d 11h 8m 34s||650||class="GoldPass bCost"|1,500,000||class="GoldPass bTime" style="white-space:nowrap;"|1d||class="GoldPass EXP"|293||class="GoldPass catchUp" style="white-space:nowrap;"|13d||6 |
||
| − | |10 hr |
||
| − | | |
+ | |- |
| + | |7||16||3.84||style="white-space:nowrap;"|6h 15m||style="white-space:nowrap;"|4d 4d||750||class="GoldPass bCost"|2,500,000||class="GoldPass bTime" style="white-space:nowrap;"|2d||class="GoldPass EXP"|415||class="GoldPass catchUp" style="white-space:nowrap;"|14d||7 |
||
| − | |14 |
||
| − | | |
+ | |- |
| + | |8||17||4.32||style="white-space:nowrap;"|5h 33m 20s||style="white-space:nowrap;"|3d 22h 26m 40s||850||class="GoldPass bCost"|3,500,000||class="GoldPass bTime" style="white-space:nowrap;"|4d||class="GoldPass EXP"|587||class="GoldPass catchUp" style="white-space:nowrap;"|32d||8 |
||
| − | |4d 12h 23m 14s |
||
| ⚫ | |||
| − | |3d 21h 20m |
||
| + | |9||18||4.80||style="white-space:nowrap;"|5h||style="white-space:nowrap;"|3d 18h||1,000||class="GoldPass bCost"|4,500,000||class="GoldPass bTime" style="white-space:nowrap;"|6d||class="GoldPass EXP"|720||class="GoldPass catchUp" style="white-space:nowrap;"|54d||9 |
||
| − | |526 |
||
| − | | |
+ | |- |
| + | |10||19||5.04||style="white-space:nowrap;"|4h 45m 43s||style="white-space:nowrap;"|3d 18h 28m 34s||1,150||class="GoldPass bCost"|5,500,000||class="GoldPass bTime" style="white-space:nowrap;"|8d||class="GoldPass EXP"|831||class="GoldPass catchUp" style="white-space:nowrap;"|160d||10 |
||
|} |
|} |
||
| − | + | <p style="margin-left: 16px; text-indent: -9px;">* These values are exact values that are derived from the game files. In-game, this statistic is rounded down to one decimal place.</p> |
|
| + | <p style="margin-left: 16px; text-indent: -9px;">** The ''Catch-Up Point'' is the time at which the newly upgraded Gem Mine has equaled the total production of the mine ''had it not been upgraded'' - this does not consider recovering the cost of the [[Resources#Builder Elixir|Builder Elixir]] required to perform the upgrade.</p> |
||
| − | '''Caveat:''' The ''Catch-Up Point'' calculation assumes that the player collects all resources from the Gem Mine without allowing it to reach its storage capacity, as resource production ceases at that point. |
+ | '''Caveat:''' The ''Catch-Up Point'' calculation assumes that the player collects all resources from the Gem Mine without allowing it to reach its storage capacity, as resource production ceases at that point. If the player is unable to regularly collect and achieve the full potential of the collector, the ''Catch-Up Point'' is actually shorter and performing the upgrade becomes more advantageous. |
| − | {{BuilderBaseBuildingsMenu}}</div> |
||
| ⚫ | |||
| + | </div> |
||
| ⚫ | |||
| + | |||
| ⚫ | |||
| + | {|class="wikitable mw-collapsible" style="width:100%" |
||
| ⚫ | |||
| + | !Patch |
||
| + | !Description |
||
| ⚫ | |||
| + | ![[Version History/2017#Version 9.24.1 - 22nd May 2017 "Builder Hall Release"|May 22, 2017]] |
||
| + | |Added the Gem Mine, with 5 levels.[[File:Gem Mine1.png|65px|link=]][[File:Gem Mine2.png|65px|link=]][[File:Gem Mine3.png|65px|link=]][[File:Gem Mine4.png|65px|link=]][[File:Gem Mine5.png|65px|link=]] |
||
| ⚫ | |||
| + | ![[Version History/2017#Version 9.105.4 - 27th June 2017|June 27, 2017]] |
||
| + | |Added Gem Mine level 6.[[File:Gem Mine6.png|65px|link=]] |
||
| ⚫ | |||
| + | ![[Version History/2017#Version 9.??? - 27th September 2017 "Builder Hall 7"|September 27, 2017]] |
||
| + | |Added Gem Mine level 7.[[File:Gem Mine7.png|65px|link=]] |
||
| ⚫ | |||
| + | ![[Version History/2018#Version 10.??? - 5th March 2018 "Builder Hall 8"|March 5, 2018]] |
||
| + | |Added Gem Mine level 8.[[File:Gem Mine8.png|65px|link=]] |
||
| ⚫ | |||
| + | ![[Version History/2018#Version 11.185.8 - 10th December 2018|December 10, 2018]] |
||
| + | |Gem Mine level 3 can now be upgraded at [[Builder Hall]] level 3. Previously it required [[Builder Hall]] level 4. |
||
| ⚫ | |||
| + | ![[Version History/2019#Version 11.651.1 - 18th June 2019|June 18, 2019]] |
||
| + | |Added Gem Mine level 9.[[File:Gem Mine9.png|65px|link=]] |
||
| ⚫ | |||
| + | ![[Version History/2023#Version v15.292.8 - May 15, 2023 Builder Base 2.0 update|May 15, 2023]] |
||
| + | |Added Gem Mine level 10.[[File:Gem Mine10.png|65px|link=]] |
||
| ⚫ | |||
| + | |||
| ⚫ | |||
| ⚫ | |||
| + | *Unlike the [[Gold Mine]], there is no cart that delivers the Gems to the surface. Instead, a conveyor belt delivers the Gems to the surface and deposits them into the box at the entrance. |
||
| + | *At max level, it produces 5 Gems per day. When a maxed Gem Mine is paired with a maxed [[Clock Tower]], one boost will net a player an extra Gem. The use of one [[Magic Items/List|Clock Tower Potion]] would net 15/16 (0.9375) of a gem. |
||
| + | *Under the above conditions and assuming the Clock Tower boost is used once per day, such a Gem Mine will generate 2,190 Gems in one non-leap year, and 2,196 Gems in a leap-year. At the same rate, it would take 13 days and 8 hours to get 80 Gems (the $1 bundle) and a staggering 6 years, 142 days, and 8 hours to get 14,000 Gems (worth $100), assuming exactly one leap day happens in that span of time. |
||
| + | *The torch from the Gem Mine is actually the same tree as seen in its ruined form, as evidenced by the torch being having the same position as the tree, as well as the wood. |
||
| + | *One of the first ever suggestion of Gem Mine comes from escoangel on the forums on [https://forum.supercell.com/showthread.php/3208-Gem-mine November 6, 2012]. At the time, the idea was blacklisted by the development team. |
||
| + | {{BuildingsMenuBB}} |
||
[[Category:Buildings]] |
[[Category:Buildings]] |
||
[[Category:Resources]] |
[[Category:Resources]] |
||
[[Category:Builder Base]] |
[[Category:Builder Base]] |
||
| + | [[de:Juwelenmine]] |
||
Latest revision as of 06:46, 8 November 2023


Summary
- The Gem Mine can be unlocked in the Builder Base. It requires Builder Hall 3 to be repaired.
- When in disrepair, the Gem Mine is treated similarly to an obstacle (much like the ruined Clan Castle) and cannot be moved around; attacking troops will not be able to attack or destroy it (nor do they need to do so in order to achieve 100% destruction). Once rebuilt, it can be moved freely around.
- However, troops cannot be deployed on top of it.
- The Gem Mine, as its name suggests, produces Gems, albeit very slowly. These mined Gems are then stored until the player collects them or the storage fills.
- Like other resource-producing buildings in both villages, upgrading the Gem Mine will disable production for the duration of the upgrade.
- If you want to farm gems, this is the best way to do so(other then obstacles), but is you want to get higher builder base level, upgrade this building later as it just wastes builder elixir and has no direct improvement on your buillder base.
- Gem Farming is also paired good with the Clock Tower, as it will not just make the builder work faster and get gems quicker, it will also make gem production faster.
- Unlike the Gem Mine, The Clock Tower is still good to upgrade even if you are pushing builder base, as you get free boosts that improve in time, which helps with troop research time and builder.
Defensive Strategy
- This building serves no purpose on defense, so placing it on the outside to protect your defenses can be good.
- Placing it in the corner can stall your opponent from getting three stars or losing time on your base.
- This building has low hitpoints, so it is better to place it outside of the Walls or the base to not waste space in the base.
Upgrade Differences
- In its initial ruined state, it appears as a derelict, overgrown cave with mushrooms and a tree. A Gem insignia on a wooden hexagon on the side of the rocks can be found on the Mine's side. There are large broken wooden supports with ropes covering the entrance and a broken box. There are also Gems scattered around the Mine.
- When reconstructed, the Gem Mine is a cave-like structure with a wooden arch supported by ropes at the entrance. The Gem insignia is present on the side of the Mine, and a rail conveyor extends out of the cave, into a box containing Gems. Outside the cave is a torch.
- At level 2, the Gem Mine's arch and base are reinforced by metal instead of ropes. The vegetation on the side of the Gem Mine has been removed.
- At level 3, the top of the cave is replaced by an open roof and a pulley system. More wooden planks are added to the sides of the opened roof, in order to support the pulley. Additional reinforcing metal plates appear at the top of the entrance.
- At level 4, the reinforcing metal plates is now a bronze. A second pulley is also added for the ropes at that end.
- At level 5, the reinforcing wooden structure now extends to the back of the cave, and additional bronze plates are added to the backside of the roof. The stones at the base is slightly reorganized.
- At level 6, the pulley system becomes bronze, with wood covering the roof and a bronze piece riveted down to protect the axle. The stray bits of Gem at the side is cleared up.
- At level 7, two bronze piece secures the axle on the ends to the roof instead of the middle, which suspends the pulley system higher. Ropes can be seen between the two pulleys, and the roof is made of stone. The Gem Mine receives a stone foundation.
- At level 8, the wooden supports at the corners are replaced with larger wooden beams. The beams are slanted, does not use bronze reinforcements at the base, and support a new pulley system consisting of one large pulley with its axle attached to much bigger bronze pieces bolted to the roof.
- At level 9, the bases of the supports at the corners have been replaced with iron bases. The reinforcing plates at the roof now covers the top of the vertical beam and holds the bigger horizontal ones. The axle is now iron and protrudes out, it is bolted by golden nuts at each end, the back bronze piece is riveted, the pulley is larger and replaced with an iron groove with gold wheels.
- At level 10, the wooden beams are painted green. The pulley is thicker and is fully made of iron, another smaller pulley is added on the back, drove by a gear and pulling on a thicker rope. The Gem insignia's frame is now metal and the Gems in the mine now glow green.
Statistics
| ApplyReset |
| Number Available | Builder Hall Level | |||||||||
|---|---|---|---|---|---|---|---|---|---|---|
| 1 | 2 | 3 | 4 | 5 | 6 | 7 | 8 | 9 | 10 | |
| Total | 0 | 0 | 1 | 1 | 1 | 1 | 1 | 1 | 1 | 1 |
| Stage 1 Limit | 1 | 1 | 1 | 1 | 1 | |||||
| Stage 2 Limit | 0 | 0 | 0 | 0 | 0 | |||||
| Size |
|---|
| 3x3 |
| Level |
Capacity |
Production Rate (per day)* |
Production Time per Gem |
Time to Fill |
Hitpoints |
Build Cost |
Build Time |
Experience Gained |
Catch-up Point** | Builder Hall Level Required |
|---|---|---|---|---|---|---|---|---|---|---|
| 1 | 10 | 2.16 | 11h 6m 40s | 4d 15h 6m 40s | 300 | 120,000 | 1h | 60 | N/A | 3 |
| 2 | 11 | 2.40 | 10h | 4d 14h | 350 | 180,000 | 2h | 84 | 18h | 3 |
| 3 | 12 | 2.64 | 9h 5m 27s | 4d 13h 5m 27s | 400 | 240,000 | 6h | 146 | 2d 12h | 3 |
| 4 | 13 | 2.88 | 8h 20m | 4d 12h 20m | 450 | 450,000 | 8h | 169 | 3d 16h | 4 |
| 5 | 14 | 3.12 | 7h 41m 32s | 4d 11h 41m 32s | 550 | 1,000,000 | 12h | 207 | 6d | 5 |
| 6 | 15 | 3.36 | 7h 8m 34s | 4d 11h 8m 34s | 650 | 1,500,000 | 1d | 293 | 13d | 6 |
| 7 | 16 | 3.84 | 6h 15m | 4d 4d | 750 | 2,500,000 | 2d | 415 | 14d | 7 |
| 8 | 17 | 4.32 | 5h 33m 20s | 3d 22h 26m 40s | 850 | 3,500,000 | 4d | 587 | 32d | 8 |
| 9 | 18 | 4.80 | 5h | 3d 18h | 1,000 | 4,500,000 | 6d | 720 | 54d | 9 |
| 10 | 19 | 5.04 | 4h 45m 43s | 3d 18h 28m 34s | 1,150 | 5,500,000 | 8d | 831 | 160d | 10 |
* These values are exact values that are derived from the game files. In-game, this statistic is rounded down to one decimal place.
** The Catch-Up Point is the time at which the newly upgraded Gem Mine has equaled the total production of the mine had it not been upgraded - this does not consider recovering the cost of the Builder Elixir required to perform the upgrade.
Caveat: The Catch-Up Point calculation assumes that the player collects all resources from the Gem Mine without allowing it to reach its storage capacity, as resource production ceases at that point. If the player is unable to regularly collect and achieve the full potential of the collector, the Catch-Up Point is actually shorter and performing the upgrade becomes more advantageous.
Icon Descriptions
| Tapping this icon displays information about the Gem Mine, such as Level, Capacity, Production and Hitpoints. | |
| Tapping this icon begins upgrading the Gem Mine to the next level, if you have enough resources and a free Master Builder or O.T.T.O. When the Gem Mine is at maximum level, this icon is not shown. | |
| Tapping this icon instantly upgrades the Gem Mine to the next level, at the cost of one Hammer of Building if you have one. When the Gem Mine is at maximum level, or the Builder Hall requirements for the next level are not met, this icon is not shown. | |
| Tapping this icon, which is displayed only while an upgrade is in progress, instantly finishes that upgrade at the cost of the displayed number of Gems. | |
| Tapping this icon, which is displayed only while an upgrade is in progress, instantly finishes that upgrade at the cost of one Book of Building. This icon is only shown if you have at least one Book of Building. | |
| Tapping this icon, which is displayed only while an upgrade is in progress, instantly finishes that upgrade at the cost of one Book of Everything. This icon is only shown if you have at least one Book of Everything but do not have a Book of Building. | |
| Tapping this icon, which is displayed only while an upgrade is in progress, cancels the current upgrade and refunds half of the upgrade cost. | |
History
| Patch | Description |
|---|---|
| May 22, 2017 | Added the Gem Mine, with 5 levels.    
|
| June 27, 2017 | Added Gem Mine level 6.
|
| September 27, 2017 | Added Gem Mine level 7.
|
| March 5, 2018 | Added Gem Mine level 8.
|
| December 10, 2018 | Gem Mine level 3 can now be upgraded at Builder Hall level 3. Previously it required Builder Hall level 4. |
| June 18, 2019 | Added Gem Mine level 9.
|
| May 15, 2023 | Added Gem Mine level 10.
|
Trivia
- There are no storages for the Gems except for the Gem Mine due to your unlimited Gem inventory.
- Unlike the Gold Mine, there is no cart that delivers the Gems to the surface. Instead, a conveyor belt delivers the Gems to the surface and deposits them into the box at the entrance.
- At max level, it produces 5 Gems per day. When a maxed Gem Mine is paired with a maxed Clock Tower, one boost will net a player an extra Gem. The use of one Clock Tower Potion would net 15/16 (0.9375) of a gem.
- Under the above conditions and assuming the Clock Tower boost is used once per day, such a Gem Mine will generate 2,190 Gems in one non-leap year, and 2,196 Gems in a leap-year. At the same rate, it would take 13 days and 8 hours to get 80 Gems (the $1 bundle) and a staggering 6 years, 142 days, and 8 hours to get 14,000 Gems (worth $100), assuming exactly one leap day happens in that span of time.
- The torch from the Gem Mine is actually the same tree as seen in its ruined form, as evidenced by the torch being having the same position as the tree, as well as the wood.
- One of the first ever suggestion of Gem Mine comes from escoangel on the forums on November 6, 2012. At the time, the idea was blacklisted by the development team.
| Builder Base Buildings | |
|---|---|
| Defensive Buildings | Cannon • Double Cannon • Archer Tower • Hidden Tesla • Firecrackers • Crusher • Guard Post • Air Bombs • Multi Mortar • O.T.T.O's Outpost (Zappy) • Roaster • Giant Cannon • Mega Tesla • Lava Launcher • X-Bow • Walls Traps: Push Trap • Spring Trap • Mine • Mega Mine |
| Resource Buildings | Builder Hall (Magic Items) • Gold Mine • Elixir Collector • Gold Storage • Elixir Storage • Gem Mine • B.O.B Control |
| Army Buildings | Builder Barracks • Army Camp • Star Laboratory • Battle Machine Altar • Reinforcement Camp • Healing Hut • Battle Copter Altar |
| Other Buildings | Boat • Decorations • Obstacles • Clock Tower • Elixir Cart |